
You only need to train 1-2 dogs; they will teach the rest.
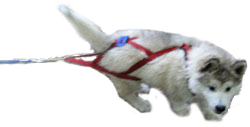
Start by purchasing a proper dog sledding/ski-jouring harness. On my links page, you find a place to purchase one with measuring instructions. If you have a growing puppy I recommend buying it 1-2 sizes larger and tying it off at the end while he grows into it. Be careful it's not so large that the harness slides down over the shoulders while pulling. Puppy training harnesses are not adjustable and so I do not recommend them. I feel they are a waste of money.
Put the harness on your dog before engaging in anything fun (excluding meal time). I put mine on my 6+ old pups before I let them go romp in the yard with me- playing chase with me is their favorite activity. When I go inside, I take the harness off and separate the dogs (if more then one was playing with us). Now play time is over, the dog is not having fun and the harness is not on either. Put the harness on for every walk. Very important. If you live in the country and do not walk your dog, start. The harness now means, "we are having fun, and we are going places".
Never leave the harness on unsupervised or while the dog is playing with another dog unsupervised. Not only will the dog chew it off, or another dog chew it off or drag him around by it, but it could get caught on something and become dangerous. The dog could also run away and become seriously tangled where no help is available.
Step 2: Accustom him to the sound and feel of pulling an object.
Step 3: The Tire (the oldest mushing trick)
Step 4: Teaching the dogs to walk ahead without you
Step 5: Teach "Hike!"
The word "mush" is only used by Hollywood. Not the best idea to use this word, dogs don't respond to it; it just isn't snappy enough.
Step 6: Sledding & Carting, Hooking them up the 1st time
Always make sure the dogs lines are tight so that they know this is how it should be. Just as in potty training, you (well you are supposed to) never give them the chance to go potty in the house, so that becomes the norm. Do not give them a chance to have their lines loose or dragging on the ground or they will get used to you doing all of the work, pushing with your foot, and think it's perfectly fine to have a loose line, after all, they are still going forward right? They are still going some where and having fun. If the line, or a line, goes loose apply even pressure on the brake adjusting the sled or cart's speed to that of the dog. Just enough to keep the line tight. The dog will learn really fast that if he wants to get some where, it is up to him, not you. And ALL sled dogs want to get somewhere! They don't know where! But they want to go some where!
If the dogs stop when the going gets tough, such as up hills, it is ok to push with your foot only if they are putting in effort. The lines must stay tight! If they stop and look at you and refuse to help, then wait them out. They want to go forward more then you do so it won't take long. When they start pulling, start helping, but not too much. Keep the lines tight! You should never work harder then them. It should be equal. That's what team work is all about. If they won't dig in and pull, you may need to go to the front, grab the neck line, give their collars a sharp jingle and thrust forward and yell "pull Anook! pull Koyuk! Let's go! Hike! Hike!" (or whatever their names are) and pull them up the hill. As soon as they're going let go, wait for the sled to come by and jump on. If they are still struggling to get up the hill, don't jump on, grab the handle bar and run behind the sled. The point is, at least you are behind them again and they are going forward. When the trail evens out again jump on and resume the ride. Always use your body weight to steer. Always try to keep them in the center of the trail (for now). Not giving them the opportunity to get to that tree line. This is the most challenging with intact boys, for obvious reasons.
If One dog is pulling but his neighbor is not, hook the lazy dog up directly behind the dog who is pulling and keep his line tight. You may need an additional team section line. This usually does the trick and gets him to keep his line tight.
Give dogs a 5 minute rest every so often. Depending on the age, size of your team, and the endurance level they have worked up to (as well as how cold/ warm it is outside). For beginners, every (what would equal) 3-4 blocks. Never stop beginners in mid run when they are doing well! Wait until they begin slowing down but STOP them BEFORE they have a chance, or begin to go toward the tree lines or off the trail. Using the word "whoa!" a few times while slowly pressing the brake. Lock the brakes or anchor the sled and if the dogs begin walking back to you say "No!" grab the neck line and put them back in place. Maybe ask them to sit and stay if they know these commands. If not, this would be a good time to teach them. Each time they get up, put them back in place. This takes a lot of patience so be ready! Work on "stay" at home so that you can praise them. Praise generally is a "release" from the command and you don't want your dogs to jump up and tangle their lines and become little monkeys on the trail! When you get back to base, however, make sure to give them tons of praise, pet and hug them and let them jump about in excitement. And WATER them! Dogs need water before and after running, immediately! Always carry a couple gallons of water and a few metal bowls in your car or truck.
MUSHING TERMS:
Sprint Sled: Extremely light weight, small sled for 1-3 dogs.
CURRENT TEAM MEMBERS
sled dog training or for people considering professional mushing.
It is indicated for people who would like to do recreational mushing, ski-jouring,
bike-jouring or dog scootering,
simply as I could so that buyers of our puppies can work their dog(s) even if
they only have 1 or 2. Recommended mushing books for serious teams are:
Dog Driver, a guide for the serious musher
Mush! A beginners guide
Speed Mushing Manual*
After a few weeks of fun time "only when harness is on", begin attaching a little light weight stick to it for him to drag along on his walks. Use an old rope or some cheap tow line from a hard ware store for training. A leash or a gangline will be burned through from dragging on the concrete. At this point, you just want your dog to get used to the sound of something dragging behind him. Hooking him to something heavy right away, even if he is more then capable, could cause him to panic and teach him to be fearful of his harness because of the loud, disturbing sound. Gradually increase the weight to a small log, and so on.
Begin with a small tire, like a wheel barrel tire or spare "donut tire" (remove any rim). You will need to drill a hole in the side of the tire large enough to push the tug line through and to keep the tug line from dragging on the concrete or dirt. It only takes 5 minutes to burn through a line on concrete and a few hours on dirt trails so it is imperative you do this to all tires you will be using in training. Begin having your pup pull the small tire on walks, gradually working up to a regular car, but tire no sooner then the dog being 6 months old. Even for two pups. By the way, you can always do training in pairs, it is much more fun for the dogs this way, and more natural. I do not recommend training more then 4 dogs at one time. In fact, 2 at once is ideal. You may not be able to control 4, untrained, wild pups.
Buy a clothes line at a department store, and a leash clip at the hard ware store (I always buy lots of spare clips while I'm there) to make a 15 foot leash. Simply tie the rope onto the end of the clip. As you're walking with the dogs who are pulling, slowly fall back and give them more rope. This step is only needed with young pups or dogs who have been trained to heel (which I don't recommend). They may freak out and repeatedly stop dead in their tracks and turn and look at you when they realize you are not right next to them any more. Simply start walking next to them again, but give their collar a pull and say "Come on", pulling the dog ahead of your body. Slowly, and secretly, try to fall back again. Never praise the dogs at any point, or they will realize you're not there and stop again! Just let them take the lead and get used to it. Don't worry if your pup won't walk ahead- in 6 months he will be dragging you down the road irregardless, and you will wish you cherished these days while they lasted.
Every so often, every minute or so, begin running at full speed with your dog(s), give a tug on the line or leash (whether pulling something or not, this works on any type of walk) and yell "Hike!". Slow down for a few seconds then speed up and again yelling, "Hike!".
If they are younger dogs, expect them to act insecure and confused. Expect that they will jump over each, tangle their gangline around their neck lines, pull over to sniff trees, stop and turn around to look at you- all these things are normal for a dog who has little desire to run yet. The best thing you can do is this: When they begin running (straight) DO NOT praise them. Try to with hold your urge to yell "good dog(s)!". They will STOP, and turn around to look at you. Then you will have to start all over. Positive re-enforcement does not work well in this situation. This is because when you stop giving the praise: A. They want more B. They think they have done something wrong since you stopped praising them C. Praise is a "release" from the command. When they begin going towards the tree lines or off the trail, steer the sled or cart, by shifting all of your weight and pulling with your arms, back toward the center of the trail again and say "NO!" in a deep tone. And then saying, "Haw Over!" or "Gee Over!" in a fun, light tone of voice. Making sure to give the sled a good thrust towards the direction you want them to go as you give the over command and shift your body weight. When they get back on track and begin running good again, leave them be, don't say anything. Your talking can be a major distraction and will break their concentration.
Hike!: Go! (used to be "Mush!")
Gee:Turn Right
Haw:Turn Left
On-by:Pass what ever, or who ever, else is on the trail- especially other teams
Whoa!:Stop
Straight Ahead!: Ignore mutliple turns in the trail or for open field running.
Wheel Dogs: Dogs hooked closest to the sled
Swing Dogs: Dogs hooked up directly behind the lead dog(s)
Team Dogs: All other dogs
Lead Dog: Dog in the very front who is best at following commands
Double Lead Dog: Two dogs in the lead
Touring Sled: Long, narrow sled for larger teams of 4-18 dogs.
Racing Sled: Light weight sled for 2-10 dog teams. Smaller then a touring sled, but large enough to hold alot of camping gear.
Trail Runner Sled: Small, light weight beginners sled for 2-8 dogs.
Tobaggon Sled: Large, long sled. Built for large teams of 6-18 dogs, and long (a week+) dog sledding trips. Can hold a small family.
Basket:Body of the sled where camping gear or people are carried.
Brush Bow: Curved part at the front of the sled prevents damage.
Runners:Plastic or metal runners that make the sled glide through the snow.
Snow Hook: Heavy metal, double dagger, hook that is tied to the sled and thrown into the ice to anchor the sled when stopped.
Sled Bag: Large, water-proof canvas rectangle shaped, sloped bag, tied in the basket of the sled to hold & protect belongings & gear.
Rig: 3-wheeled cart for off season dog sledding.
Gangline: General term used for all lines connecting dogs to sled or cart.
Tow Line:line that runs down the middle of all dogs and connects to the runners of the sled.
Team Line: Gangline used for all dogs except the lead dogs.
Lead Line: Gangline used for the 1 or 2 lead dogs.
Neck Line:
Shock Absorber: Bungee type cord that connects the gangline to the sled to smooth take off and stopping.
Freighting Harness: Heavy duty, extra padded, extra stiched harness with a wood speader bar at the rear. Used for heavy weight pulling or freight sledding.
Racing Harness: Harness designed for optimal speed.
H Back harness: Generally used for ski-jouring.
X-Back Harness: Most popular type of sledding harness. Used for recreational sledding as well as racing and ski-jouring.
Dog Booties: Ussually used on breeds such as Alaskan Huskies.
Pack: Back pack that straps onto a dog's back designed to carry gear.
Picket Line: Cable or chain line used to tether dogs to the outside of the dog trailer or truck before and after sledding or while waiting to get hooked up.
Dog Trailer: Used to transport dogs.
Quick Links: Metal oval shaped, screws open & closed, hardware accessory.
Quick Release: Metal link used to connect & release lines quickly.
Alaskan Malamute: Largest and most powerful sled dog. Used for working and recreational sledding. Most ancient sled dog.
Siberian Husky: Small, quick sled dog primarily used for racing.BR>
Samoyed: Medium sized, stout, all white sled dog used for recreational sledding & working.
Alaskan Husky: Smaller, cross bred dog (husky x bordie collie x hound) used only for speed racing. Modern racing dog. May require special accomodations for cold weather.